Install the NoPass™ Desktop Unlock
The NoPass™ Desktop Unlock feature is available at www.identite.us.
Procedure
1. On www.identite.us, navigate to Workforce>Desktop MFA.

2. On the Desktop MFA page, review the feature description and click the Get it now button.

Installing the NoPass™ Desktop app and creating a Profile
To start using the Desktop Unlock feature, download and install the NoPass™ desktop app while creating your NoPass™ Profile. If the NoPass™ desktop app has already been installed on your PC and your profile is already created, go to Creating and signing in to your Profile in the NoPass™ mobile app.
You can create your NoPass™ Profile and install the NoPass™ desktop app using your email address or via your social media (Google and Facebook) login.
Before you begin
The Desktop Unlock feature is available to Windows computers only. If you start the registration procedure on your mobile device or non-Windows computer, the following notification is displayed:

Procedure
1. On the registration page, create your NoPass™ Profile choosing one of the following options.
Option 1: creating the NoPass™ Profile using your email address
1) Fill in the Email field, select the I have read and accept the End User License Agreement check box, and click Continue.

2) The following notification is displayed:

3) Check your email box on the same computer or any other Windows computer and click the link in the received email to confirm registration.
4) The Desktop Unlock feature is available to Windows computers only. If you open the registration link on your mobile device or non-Windows computer, the following notification is displayed:
5) On the confirmation page, enter your email address and click Continue.

6) If you enter the incorrect email address, the following notification is displayed:

7) You are redirected to the following page where you will be able to download and install the NoPass™ desktop app. To continue, go to point 2 below.

Option 2: creating the NoPass™ Profile using your Google login
1) On the registration page, click the Google icon.

2) Choose the Google account that you plan to use for your Profile creation, or create a new Google account. Remember that you will have to choose the same Google account to sign in to your Profile in the future.

3) You are redirected to the following page where you will be able to download and install the NoPass™ desktop app. To continue, go to point 2 below.
Option 3: creating the NoPass™ Profile using your Facebook login
1) On the registration page, click the Facebook icon.

2) On the Facebook sign-in page, either log in to your Facebook account entering your username and password, or continue with your Facebook account.
3) You are redirected to the following page where you will be able to download and install the NoPass™ desktop app. To continue, go to point 2 below.
2. Your Profile shall be created in your NoPass™ desktop application simultaneously with installing the NoPass™ desktop app. To install the NoPass™ desktop app, click Install.

3. If you have not installed the NoPass™ desktop app and you click the Create Profile button, the following notification is displayed:

4. To install the NoPass™ desktop app, make sure that the pop-ups are not blocked by your browser. Select the Always allow pop-ups and redirects from the https://nopass.us radio button and click Done.

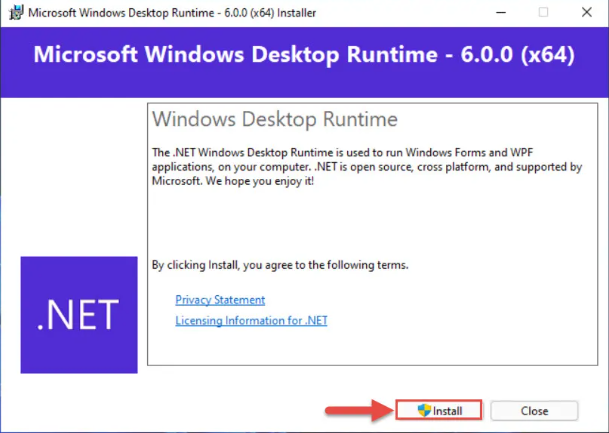
5. Make sure .Net Runtime is installed on your computer. Otherwise, click Install in the following dialogue box to install the necessary software.
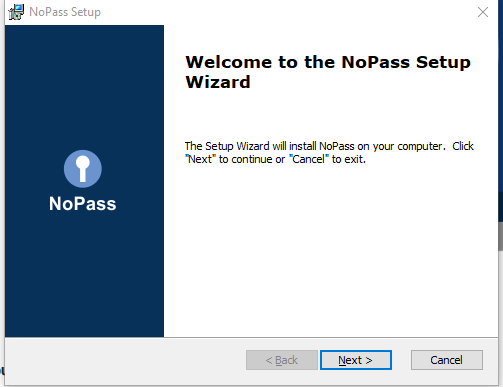
6. Follow the NoPass™ Setup Wizard instructions.
7. After you have installed the NoPass™ desktop app, create your Profile by clicking the Create Profile button.

8. After your Profile is created, the following notification is displayed.

Your next step is to create or sign in to the NoPass™ Profile in your mobile app. To do so, go to Creating and signing in to your Profile in the NoPass™ mobile app.
Creating and signing in to your Profile in the NoPass™ mobile app
Procedure
1. After you have installed the NoPass™ desktop app and created your Profile, you are redirected to the web page with further instructions.

2. If you have already installed the NoPass™ mobile app on your mobile device, skip Step 1 in the instruction on your screen and go to Step 2 (point 4 below). Otherwise, perform the following steps.
3. Make sure you have the NoPass™ mobile app installed on your mobile device. To install the NoPass™ mobile app on your mobile device, scan the QR codes in Step 1 with your iOS or Android device respectively. You will be redirected to App Store or Google Play respectively to download and install the NoPass™ mobile app. For more details, go to Download and install your NoPass™ app.
4. To sign in to your Profile in your NoPass™ mobile app, follow the instructions in Step 2. Perform the following actions:
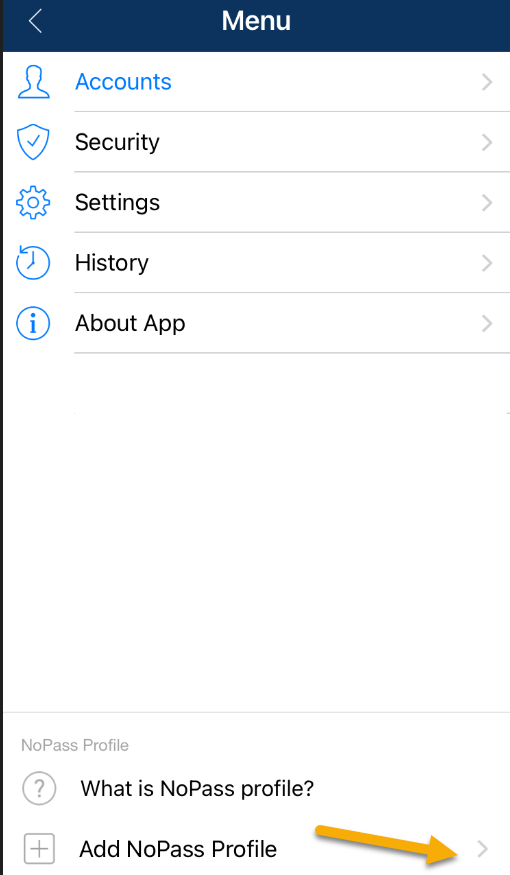
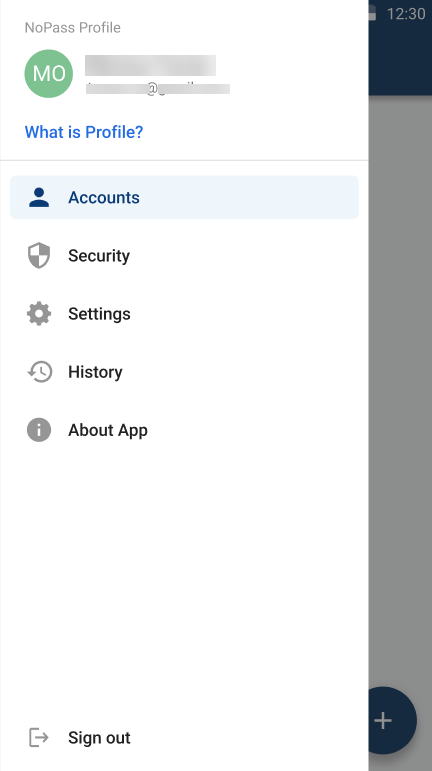
1) On the Menu screen, tap + Add NoPass™ Profile.
Android

iOS
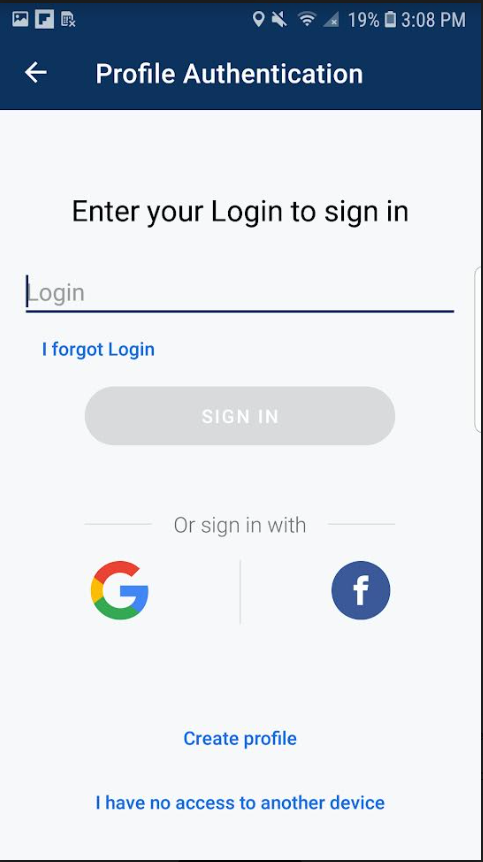
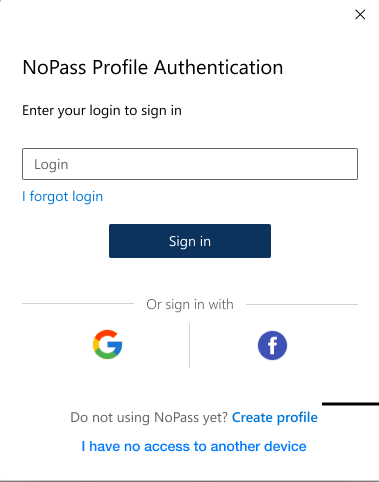
2) On the Profile authentication screen, enter your email address and tap Sign in.
Android
iOS

3) Accept the push notification in your desktop app.

4) If your registration is successful, your Profile is added to your NoPass™ mobile app.
Android
iOS
Now that you have installed the NoPass™ desktop app on your Windows computer and the NoPass™ mobile app on your mobile device, and signed in to your Profile both in your NoPass™ desktop and mobile app, your next step is to enable the NoPass™ Desktop Unlock feature.
enabling the windows desktop unlock
Procedure
1. After you have signed in to your Profile on your mobile device, click Settings in Step 3.

2. On the Settings page of your NoPass™ desktop app, switch on the Passwordless Desktop Unlock toggle.

3. To enable the NoPass™ Desktop Unlock feature, enter your Windows login and password, then click Save.

4. If you have no Windows login and password, the following notification is displayed:

5. To learn how to set up your Windows password, click Read the User Guide in your NoPass™ Desktop app or go to Set up your Windows password.
6. After you have provided your Windows credentials, your NoPass™ Desktop Unlock feature is enabled.
Signing in to your NoPass™ Profile
If you have already created your NoPass™ Profile in the browser, you can sign in to your Profile to use the NoPass™ Desktop Unlock feature. To do so, the following preconditions are to be met:
- You should have your NoPass™ Profile registered in the browser.
- You should be signed in to your NoPass™ Profile either on your mobile device (Procedure 1) or on your desktop (Procedure 2) or both (Procedure 3).
Procedure
You can sign in to your NoPass™ Profile using your NoPass™ login or your social media (Google and Facebook) login.
1. Perform one of the following steps:
- On the registration page, click Sign in.

- On the www.nopass.us page, click Sign in.

2. You can sign in to your NoPass™ Profile by choosing one of the following options.
Option 1: Sign in to your NoPass™ Profile with your NoPass™ login.
1) On the following page, enter your NoPass™ login and click Sign in.

2) A push notification is sent to your mobile device. Compare the picture and the 3-digit code on your PC and your mobile device. If they are identical, click Accept on your mobile device. Then, go to point 3 below.
3) If you are signed out from all your devices or have no NoPass app installed on your desktop computer and your mobile device, the following notification is displayed:

3) Click sign in with email and the registration link and code shall be sent to your email address.
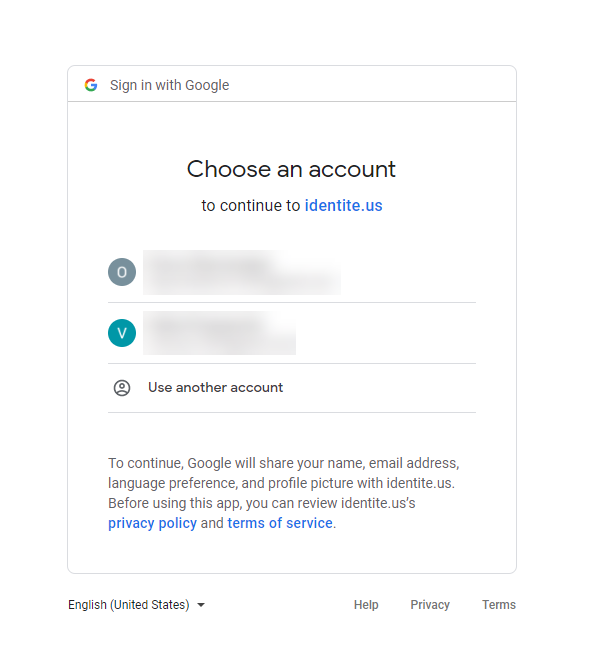
Option 2: sign in to your NoPass™ Profile with your Google login
1) On the following page, click the Google icon.

2) Click the Google account that was used to register your NoPass™ Profile from the list of your Google accounts.
3) A push notification is sent to your mobile device. Compare the picture and the 3-digit code on your PC and your mobile device. If they are identical, click Accept on your mobile device. Then go to point 3 below.
Option 3: sign in to your NoPass™ Profile with your Facebook login
1) On the following page, click the Facebook icon.

2) On the Facebook sign-in page, you should either log in to your Facebook account by entering your username and password or continue with your Facebook account.

3) A push notification is sent to your mobile device. Compare the picture and the 3-digit code on your PC and your mobile device. If they are identical, click Accept on your mobile device. Then go to point 3 below.
3. Your next actions depend on what devices you are signed in to.
Procedure 1: you are signed in to the NoPass profile on your mobile device only
1) After you have signed in to your NoPass™ Profile, you are redirected to the page with the instructions to download and install your NoPass Windows app.

2) To download and install the NoPass™ desktop app, click Install in Step 1. Then repeat points 4-8 from the Section Installing the NoPass™ Desktop app and creating a Profile.
3) Otherwise, perform Step 2 from the instruction above. To sign in to your NoPass™ Profile in your NoPass™ desktop app, click Add NoPass Profile in your NoPass™ desktop app.

4) On the NoPass™ Profile authentication screen, enter your email and click Sign in.
5) The authentication request is sent to your mobile device. Tap Accept to confirm your authentication.

6) After you have signed in to your NoPass™ Profile in your NoPass™ desktop app, you can enable the NoPass™ Desktop Unlock feature in the Settings menu (Step 3 in the instruction on your screen). To learn how to do it, go to Enable the NoPass™ Desktop Unlock.
Procedure 2: you are signed in to the NoPass profile on your desktop app, but signed out on your mobile device
1) After you confirm your authentication with the Accept button, you are redirected to the following instruction:

2) To install the NoPass mobile app and sign in to your profile on your mobile device, perform steps 3-4 from the Creating and signing in to your Profile in the NoPass™ mobile app.
3) After you sign in to your profile on your mobile device, click Settings in Step 3 of the instruction on your screen.
4) Now, you can enable your Desktop Unlock feature.
Procedure 3: you are signed in to your profile on your NoPass desktop app and your mobile device
1) After you confirm your authentication with the Accept button, you are redirected to the following instruction:
2) To enable the Desktop Unlock feature, click Settings in Step 3 of the instruction on your screen.