Set up additional authentication factor
In your NoPass™ macOS desktop application, you can set up an additional authentication factor for security reasons. You can select from three additional factors of authentication:
- a PIN code
- a biometric factor for additional protection
- a hardware authentication device - Yubikey
Set up additional authentication factor
Procedure
1. Open your NoPass™ desktop application and navigate to Security.
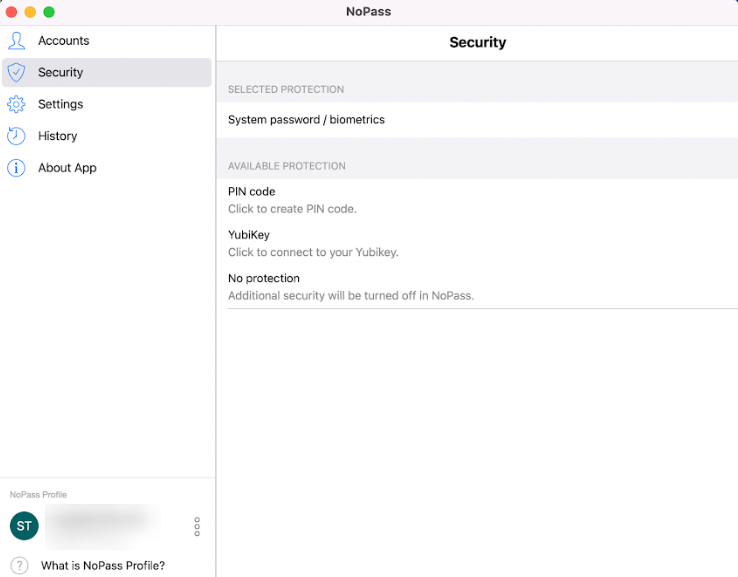
2. When you select No protection under Selected protection tab, you are not required to use any additional authentication factors when performing any actions in your NoPass desktop app. As soon as you select any additional authentication factor from the Available protection tab, this factor moves to the Selected protection tab and you will be obliged to use this authentication factor every time you perform any action in your NoPass desktop app.
Set up PIN code as additional authentication factor
Procedure
1. To set up a PIN code as a second authentication factor, click PIN code.

2. In the following dialog box, enter a 6-digits PIN code and click Confirm.

3. On the next screen, repeat the selected PIN code and click Save.

4. To change the existing PIN code, click Edit.

5. On the following screen, enter the existing PIN code and click Confirm.

6. Then, enter the new PIN code and click Confirm.

7. To confirm your action, enter the new PIN code again and click Save.

Set up System password / biometrics as additional authentication factor
The NoPass app allows you to use the password / biometrics set up on your macOS computer as an additional authentication factor. To learn how you can set up your password /Touch ID on your macOS computer, see the Set up password / Touch ID on your MacOS computer section below.
To set up system password / biometrics, perform the following steps.
Procedure
1. On the Security screen, click System password/biometrics under Available protection.

2. After system password / biometrics is set up as additional authentication factor, you will need to use Touch ID every time you want to perform an action in the NoPass app.

3. As the Touch ID option prevails over password, after you enter the password in the dialogue box above, your authentication with password is disabled.

4. Press the Touch ID button on your keyboard to perform the required action.
Using YubiKey as additional authentication factor
A YubiKey is a hardware authentication device used to protect access to your macOS computer, networks and online services. More information on how YoubiKey works can be found on Yubico website.
Procedure
1. On the Security screen, click YubiKey under Available protection.

2. The following notification is displayed:

3. Press the buttons on both sides of YubiKey simultaneously to complete authentication. YubiKey factor moves to the Selected protection tab
4. After YubiKey is set up as additional authentication factor, you will need to use your YubiKey every time you want to perform an action in the NoPass app.
Set up password / Touch ID on your MacOS computer
When you set up your macOS computer, you create your user name and password that can be later used to protect your applications and folders and unlock your macOS computer. At the same time, you can set up Touch ID as additional protection of your macOS computer.
Procedure
1. On your macOS computer, navigate to System Preferences.

2. On the System Preferences menu, click Touch ID.

3. Under the Touch ID tab, select the check-boxes specifying what actions are to be protected with Touch ID.

4. To confirm your actions, enter your password used to unlock your Mac computer.

5. Follow the instruction on the next screen to set up your fingerprint as Touch ID.

6. As soon as your fingerprint is provided, click Done.
